Showing posts with label Chocolate Boot Camp. Show all posts

Tuesday, February 15, 2022

Quick Tip: No pre-bottomer? Try this!

No pre-bottomer? No problem! With RCI Chocolate Boot Camp course taking place next week, we’re sharing a quick and easy solution, demonstrated by Instructor Joe Sofia with Cargill Cocoa & Chocolate, for candy makers who do not have a pre-bottomer on their enrober.
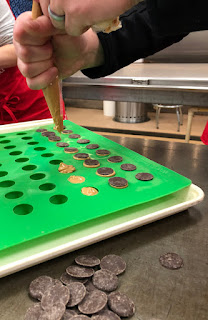
This handy  tip uses chocolate wafers as the pre-bottom for, in this case, moulded peanut butter meltaways. Joe explained, "When you pop the meltaways out of the mould, they are ready for the full enrobing since the wafer will adhere to the meltaway." Joe also added that it's important to apply the chocolate wafer while the center is still liquid so the two stick together.

For this particular demonstration, a 22-millimeter silicon dome mould from Truffly Made was a perfect fit when using a standard chocolate wafer as the base.

If you’re interested in more pro tips like this, consider attending RCI’s next Chocolate Boot Camp course in August 2022. If you’re not a member of RCI and you would like to be notified when registration opens, click here to be added to RCI’s email list.

Crave more? Click here to subscribe and start receiving weekly tips, like this, delivered straight to your email inbox. RCI's blog is just one of the many resources we offer to help candy makers refine their craft and build upon their business and marketing practices. Follow us on Facebook for even more sweet inspiration.

Not a member? Click here to learn how RCI can help you build your sweet business.

Tuesday, June 4, 2019

Throwback Tip #246: Making Meltaways with Untempered Chocolate


The most common way to make a meltaway is to combine tempered chocolate with melted coconut oil until it is smooth. Because coconut oil is a lauric fat, it must be added at a lower temperature so not to throw the chocolate out of temper. If the chocolate becomes untempered (or was never tempered to start with) the nice, smooth texture of the meltaway will eventually be replaced with an unpleasant mouthfeel due to the formation of fat globules.

Mixing Things Up
Consider this alternative method to making stable, smooth-textured meltaways with untempered chocolate. Instead of adding fat to tempered chocolate, combine untempered chocolate and coconut oil in a mixer. Mix at a slow speed until the temperature is below 78ยบ F and has visibly thickened. Referred to as the “mixer method” in curriculum shared at RCI’s Chocolate Boot Camp®, it achieves the same desired stability and texture the meltaway is revered for, without the hassle of keeping temper.

If you live in the Connecticut area, it’s not too late to register for RCI’s Annual Convention & Industry Expo in Hartford, Connecticut June 3-7, 2019 at the Connecticut Convention Center. Attend RCI’s two-day Industry Expo for only $5 with promo code RCIHigh5Click here to register online today!

As always, attending RCI’s Industry Expo is free to members! Extend your stay and we’ll extend the early-bird discount to offer you the best value! Register now and save $100 on the Convention Pass or 3-Day Pass when you use the promo code SAVE100.

Crave more? If you like what you read here, look for the "Subscribe now" box on the right to enter your email address and start receiving weekly tips, like this, delivered straight to your email inbox. RCI's Tip of the Week blog is just one of the many resources we offer to help candy makers refine their craft and build upon their business and marketing practices.

Tuesday, February 19, 2019

Tip #293: Test Your Chocolate Knowledge


So, it’s February! And how are those New Year’s resolutions coming along?

Whether you made a resolution to improve your business this year or not, now is a great time to evaluate the goals you do have and measure your progress since setting those goals. Experts agree measuring your progress on an ongoing basis is a vital part of successfully attaining goals.

If you aspire to learn more about chocolate and expand your candy making skills, we’ve pulled sample questions from RCI’s Chocolate Boot Camp® “School of Knowledge” quiz, as a way to help you take a pulse of your chocolate knowledge.

1. Which of the following steps of cocoa bean processing must take place within the growing country?
   A. Conching
   B. Winnowing (shell removal)
   C. Fermentation
   D. All of the above

2. When tempering chocolate, what percentage of solid fat crystals is desired when process is complete?
   A. 0.1 - 1.0%
   B. 1.5 - 4.0%
   C. 5.0 - 8.0%

3. Which of the following will contribute to bloomed bottoms?
   A. Cold belt temperatures
   B. Using chocolate in bottomer
   C. High-viscosity chocolate
   D. All of the above

4. When removing confections from freezer storage, typical temperature profile is:
   A. 0°F - 30°F - 70°F
   B. 0°F - 40°F - 70°F
   C. 0°F - 50°F - 70°F              

Now that you've completed the sample quiz, ask yourself, how confident do you feel in your answers? Would you qualify for master chocolatier status or could you use a refresher on the subject? See post #295 for the answers.

Warren Buffet once said, “The best investment you can make is an investment in yourself, the more you learn the more you’ll earn.” Whether you're a veteran chocolatier or a newcomer to the industry, if you aspire to learn more and expand your candy making skills, consider ways to invest in your education. Thankfully education is more accessible than ever before! Education is available in all different formats; print, webinars, podcasts, seminars and workshops, certifications and courses, even in-person meetings such as trade shows or local networking events. Experiment with different learning formats to find out what works best for you.

Want to learn more about RCI’s upcoming events and education? Click here to receive notifications about when registration opens for events and education courses, like RCI’s Chocolate Boot Camp and Annual Convention & Industry Expo.

Crave more? If you like what you read here, look for the "Subscribe now" box on the right to enter your email address and start receiving weekly tips, like this, delivered straight to your email inbox. RCI's Tip of the Week blog is just one of the many resources we offer to help candy makers refine their craft and build upon their business and marketing practices.

Tuesday, February 12, 2019

Throwback Tip #233: How to Know Chocolate is in Good Temper


Checking your temper is an important step to ensure you aren’t surprised by unsightly bloom or dull or tacky chocolates.

Chocolates that have a dull appearance may be over tempered, while rapid bloom or a tacky, greasy surface are indicators that chocolate is under tempered. Quit guessing and rest assured your chocolate is always in good temper with these two methods for checking your temper.

The Blade Test: This method is quick, easy and budget friendly; however, the results could vary on the temperature of the room.

Simply dip a metal spatula or knife blade into the chocolate and leave a small film on the blade. At room temperature (65-68° F), well-tempered chocolate should be firm, not tacky, after just five minutes.
Tempermeter: Although more costly, this method will most accurately measure the degree of tempering, indicating the quality and quantity of stable crystals that have been formed.

Tempermeters produce a temperature-versus-time curve, resulting from uniform cooling of a chocolate sample over a specified period of time.
It may be easy to assume your chocolate is well tempered and ready to move into the assembly line, however, skipping this step could result in a costly mistake. 

Choose a testing method that works best for you and put a plan in place to ensure your chocolate is being checked on a regular basis. Many of our candy maker members have a system in place to verify their chocolate’s temper every hour.

Next week: Check your chocolate knowledge and stay tuned for details on RCI’s 2019 Chocolate Boot Camp®!

Crave more? If you like what you read here, look for the "Subscribe now" box on the right to enter your email address and start receiving weekly tips, like this, delivered straight to your email inbox. Plus, review past blog posts for quick and actionable tips to apply to your business. RCI's Tip of the Week blog is just one of the many resources we offer to help candy makers refine their craft and build upon their business and marketing practices.

Tuesday, August 14, 2018

Tip #273: Don’t Skip This Step When Roasting Nuts


Not only do roasted nuts add satisfying crunch and crave-worthy sweet and salty flavors to chocolate confections, the pungent aroma of freshly roasted nuts, alone, can lure nearby shoppers into your candy store. This week’s brief tip, shared during RCI’s Chocolate Boot Camp®, is a must for candy makers who roast their own nuts.

REDUCE THE RISK OF BLOOM
To reduce the risk of fat bloom, due to fat migration, wait at least 48 hours to coat roasted nuts with chocolate. This practice allows the oils to reabsorb into the nuts. Keep in mind, dry roasted and whole nuts will have less free fat than those that are oil roasted.

STOP CRACKS IN THEIR TRACKS
Waiting to enrobe roasted nuts will also help lessen the chances of unwanted cracks in these chocolate-covered morsels. Quick and easy tips like these will help ensure your nutty delights look and taste as good as they smell!

Stay connected with RCI through Facebook for more tips and inspiration dedicated to the retail candy maker. Not a member? Click here to learn how RCI can help you build your sweet business.

Tuesday, January 30, 2018

Tip #254: Secret Enrobing Tools and Techniques Unveiled


In honor of RCI’s upcoming Chocolate Boot Camp® course, taking place February 19-22 in Waterbury, Connecticut. We’re unveiling two simple, yet highly effective tools and techniques that are sure to improve your enrobed centers.

Stringing
It may surprise you to learn that stringing or marking a coated center offers more benefit than simply identifying the center. Whether you string by hand, a fork or an automatic decorating machine, those stringing marks can hide small imperfections on the surface (such as air bubbles) and give the product a more glossy appearance. The three dimensional quality of the markings create more angles for light to reflect, much like the facets of a diamond.

TRY IT: Next time you are coating centers, mark one piece and leave the next piece smooth. The chocolate temper will be the same on both, but the strung piece will have a better shine once cooled.

Detailer Rods
Even a small adjustment to the detailer rod can make a big
difference to your finished product.
Detailer rods, located after each wire belt, affect the bottom and bottom edges of the centers. When used properly, the rod is close to the wire belt and slightly below the level between the wire and cooling belts. If adjusted too low, this will result in tails (pictured on the far left) or bases (center photo). When set too high, it will remove too much chocolate, leaving thin bottoms (as seen in the photo on far right. Should the detailer be set too far away from the wire belt it can also scrape bottoms and deposit lines of chocolate onto the cooling belt. Even a small adjustment to the detailer will make a big difference in your finished chocolates.

RCI Members: Login at retailconfectioners.org to access more secrets to enrobing in the 2016 first quarter issue of Kettle Talk magazine, written by Jim Bourne, of Hilliard’s Chocolate System.

Tuesday, November 28, 2017

Tip #246: Making Meltaways with Untempered Chocolate


The most common way to make a meltaway is to combine tempered chocolate with melted coconut oil until it is smooth. Because coconut oil is a lauric fat, it must be added at a lower temperature so not to throw the chocolate out of temper. If the chocolate becomes untempered (or was never tempered to start with) the nice, smooth texture of the meltaway will eventually be replaced with an unpleasant mouthfeel due to the formation of fat globules.

Mixing Things Up
Consider this alternative method to making stable, smooth-textured meltaways with untempered chocolate. Instead of adding fat to tempered chocolate, combine untempered chocolate and coconut oil in a mixer. Mix at a slow speed until the temperature is below 78ยบ F and has visibly thickened. Referred to as the “mixer method” in curriculum shared at RCI’s Chocolate Boot Camp®, it achieves the same desired stability and texture the meltaway is revered for, without the hassle of keeping temper.

Newcomers and veterans alike are invited to learn techniques of chocolate making, like this, during RCI’s Chocolate Boot Camp February 19-22, 2018 in Waterbury, CT at Fascia’s Chocolates. This popular hands-on course covers topics such as:
  • Tempering
  • Moulding
  • Enrobing
  • Chocolate Artistry
  • and more!
SPACE IS VERY LIMITED! This course is expected to sell out! For complete information and to register online, visit retailconfectioners.org/bootcamp.

Tuesday, May 2, 2017

Throwback Tip #133: 3 Ways to Extend the Shelf Life of Your Truffles

Today is National Truffle Day! Often considered the highest expression of a quality confection and often commands the highest price when purchasing, there’s no question why these little morsels are good cause for celebration.

A decadent truffle made with high-quality ingredients is a welcome surprise to chocolate lovers around the world, however, the surprise appearance of mold could ruin your sweet reputation. Keep reading for three ways to extend the shelf life of your truffles.

Reduce Water Activity
The high moisture of cream is often the cause of microbial growth in truffles. While cream arrives pasteurized, it is usually scalded to 190°F to ensure there’s no yeast and mold.

Reducing water activity will reduce the microbial growth and can be accomplished by:
  • Replacing a portion of the cream with corn syrup
  • Adding invertase (an enzyme derived from yeast)
  • Increasing fat percentage
  • Increasing chocolate solids
Use of Preservatives (including natural preservative options)
Preservatives can also control microbial growth. Potassium sorbate is one of the most effective options, however it is not usually considered natural. Natural preservatives might include cultured dextrose. Other preservatives can include reducing the pH of the ganache or the addition of alcohol. Legal and flavor considerations, however, must be addressed before using these methods.

Reduce Storage Temperature
A rule of thumb is that reducing the temperature by 18°F (10°C) will double the shelf life. Freezing truffles can substantially increase their shelf life, however, this must be done properly. Click here to view previous blog post on freezing truffles.

A truffle’s short shelf-life is a major challenge for many confectioners. With these tips from RCI’s Chocolate Boot Camp you can effectively extend the shelf-life of your truffles and avoid any unwanted surprises.

Get solutions to your problem candies from fellow confectioners and industry suppliers at RCI's Annual Convention & Industry Expo next month! Register online now and join us in Chicagoland June 12-16, 2017!

Stay connected with RCI through Facebook for more tips and inspiration dedicated to the retail candy maker. Not a member? Click here to learn how RCI can help you build your sweet business.

Tuesday, January 17, 2017

Tip # 217: Get the Crunch Without the Cracks


Randy Hofberger of R&D Candy Consultants, LLC, is an active member of RCI and the lead instructor for RCI’s Chocolate Boot Camp®. This week’s post is an excerpt from his article “Crunch Without the Cracks,” which offers eight tips to reduce cracking in chocolate-covered pretzels, cookies and crackers.

Texture is so very important in our foods and is a large part of the eating experience. Many of our most popular confections have a crunchy texture and using baked goods such as cookies, crackers and pretzels is one way to provide this. When coated with chocolate, however, there is a chance the finished product will crack, making it less appealing to consumers.

What cause these fissures to develop? While it may seem that there are little micro earthquakes occurring on your pretzels or gremlins attacking the chocolate-covered cookies, one of the main culprits can be moisture entering these dry baked goods and causing them to expand. To prevent moisture from coming in contact with the finished product, one of the most obvious solutions is to use packaging with a good moisture barrier. While this will solve many of the cracking problems, there are other factors that can cause cracking. Also, this will not help any of your products that are open to the atmosphere in your display cabinets.

Other suggestions to reduce cracking in chocolate covered pretzels, cookies and crackers include the following:

  1. Have a uniform coating. Unequal coverage will cause different contraction rates and, thus, cracking.
  2. Thicker coating is a stronger coating and a better moisture barrier. Coverage should be complete without pin holes, air bubbles or thin spots.
  3. Using a chocolate formulated to be softer will be less prone to cracking.
  4. Enrobed baked goods will generally have less of a heat load and will require a gentler (less) cooling.  Good cooling tunnel conditions will have little or no air movement at the tunnel entrance and a temperature of approximately 65ยบF.  Air velocity may be gradually increased to about 700 CFM until the chocolate is set – at which time velocity may be increased to 1200 CFM. Coldest tunnel temperatures exceed the low 50sยบF. Total tunnel time should be a minimum of eight minutes, but 12 minutes is better.
    If your operation requires you to maintain consistent tunnel settings because of various product mixes, increasing the tunnel belt speed will give less total cooling and more line production. 
  5. Enrober/tunnel/feeding area relative humidity should not exceed 55%.
  6. Pieces to be enrobed should be room temperature or warmer (up to 78ยบF).
  7. Pretzel and cookie packages can be opened the evening prior to enrobing. This will help them equilibrate to the atmospheric conditions.
  8. Rough-surfaced centers reduce cracking and the loss of the chocolate shell, e.g., salted pretzels are better than unsalted pretzels.

 Stay connected with RCI through Facebook for more tips and inspiration dedicated to the retail candy maker. Not a member? Click here to learn how RCI can help you build your sweet business.

Tuesday, October 11, 2016

Tip # 206: Give Thanks with a Chocolate Cornucopia

Photo courtesy of Cargill Cocoa & Chocolate
Turn heads with this bountiful display, which can be filled with chocolates, chocolate-dipped fruits and other fall favorites. Remind shoppers through merchandising that this tasteful cornucopia would make for the perfect dressing for their holiday table or a welcome and thoughtful hostess gift.

Chocolate Cornucopia
Recipe courtesy of Cargill Cocoa & Chocolate
Materials needed:
• (1) 12” wicker cornucopia
• (1) one-gallon plastic storage bag
roll of tape
pastry brush or latex glove
vegetable brush
Ingredients:
• Peter’s Lenoir™ semisweet chocolate
• non-toxic, fresh salal leaves*
gold and copper luster dust (optional)
*Commonly known as lemon leaves. Available through floral supply shops.
Directions:
Cornucopia
Cover outside of 12” wicker cornucopia with a one gallon plastic storage bag, fitting snugly; secure with tape. Using a pastry brush or latex-gloved hand, apply three thick coats of Peter’s Lenoir™ semisweet chocolate over the surface, allowing each application to dry before adding the next. Remove wicker cornucopia; peel away and discard bag.
Chocolate Leaves 
Scrub non-toxic fresh salal leaves* with vegetable brush; rinse thoroughly and air dry. Use a small metal spatula to coat the back side of leaves with Peter’s Lenoir™ semisweet chocolate. Clean edges of excess chocolate. Chill until dry. Grasp leaf near the stem, gently pulling it away.
Decorating the Cornucopia  
Trim ragged edge of the open end. Attach large chocolate leaves along open end, overlapping and extending them slightly over the edge. Use increasingly smaller leaves until entire top and sides of cornucopia are covered. Brush with gold and copper luster dust (optional).

Learn techniques like this and others at RCI’s Chocolate Boot Camp in Waterbury, Connecticut February 20-23, 2017. Register now at retailconfectioners.org/bootcamp.


Stay connected with RCI through Facebook for more tips and inspiration dedicated to the retail candy maker. Not a member? Click here to learn how RCI can help you build your sweet business.

Tuesday, March 1, 2016

Tip # 186:Take 3 Tips from RCI’s Chocolate Boot Camp


Last week, twenty-seven chocolatiers participated in Retail Confectioners International’s Chocolate Boot Camp®. Although students in the course varied in age and experience, each of them graduated with a better understanding of working with chocolate.

“No matter what size your company is or how long you have been in business, there is always something to learn at Chocolate Boot Camp," says Michael Crudden, Vice President of Operations at Rosalind Candy Castle and 2016 course graduate.

We’ve snagged 3 quick tips from this popular course to share with you! Even if you’re a seasoned vet, you may be surprised to learn something that you can incorporate into your business.

Tip #1: Some centers need to be cooled in order to make them firm enough to hold their shape. If centers are too cold, they will cause the chocolate coating to crack and have a dull finish. Ideally, centers should be between 65-75 degrees Farenheit when coated in chocolate.
  
Tip #2: When using chocolate moulds, avoid bloom by making sure the moulds are 4 degrees Fahrenheit cooler than the chocolate.


Tip #3: If you don’t have a tempermeter, dip a knife blade into chocolate, leaving a thin film on the blade. If the chocolate is firm and not tacky in 5 minutes, at normal room temperature (65-68 degrees Farenheit), it is in good temper.
Not a member? Click here to learn how RCI can help you build your sweet business.